Step By Step DTL Conversion
On This Page
- Overview of the DTL conversion process
- Step 1: Export your figure's fbx and dtu files from DazStudio using the DazToUnreal bridge
- Step 2: Run the DTL Export script from within DazStudio to export your figure's JCMs and morphs
- Step 3: Open the dtu file produced by the DazToUnreal plugin in Maya
- Exporting Clothes / Hair / Shoes Separately
Overview of the DTL conversion process
Step 1: Export your character FBX from DazStudio using the DazToUnreal Plugin
With your figure selected, go to File -> Send To -> DazToUnreal. The DazToUnreal export dialog appears. If the scene has not been saved then DazToUnreal and DTL will use the figure name (as shown in the scene hierarchy) as the Asset Name.
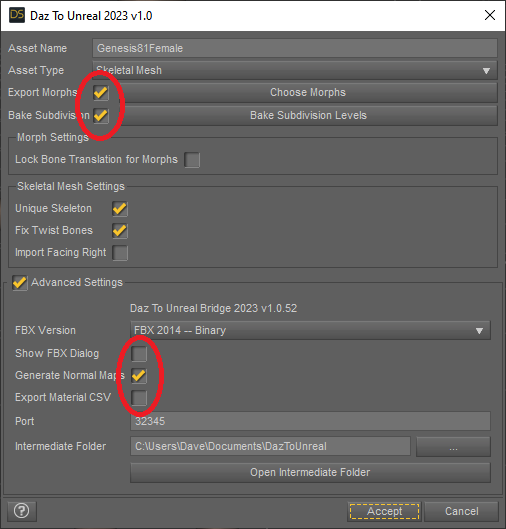 DazToUnreal Export Dialog
Note the checkboxes circled in red in the image above. In particular, even if exporting at subdivision level zero, it is important that the 'Bake Subdivision' checkbox is checked.
Many Daz asset materials have a Bump map but no Normal map. Unreal Engine does not support Bump maps, so the DazToUnreal plugin does a great job of creating Normal maps for use in Unreal. For this reason, it is important to make sure the 'Generate Normal Maps' checkbox is checked.
Exporting shoes: If shoes that require a foot pose are being exported, the 'Show FBX Dialog' checkbox in the Advanced Settings shown above needs to be checked. When the 'FBX Export Options' dialog comes up next, the 'Include Rotation Locks' checkbox needs to be unchecked.
 DazToUnreal FBX Export Dialog
The foot pose will be zeroed out automatically during the DazToUnreal export process. If the feet pose is not seen to be zeroed out during the export process then it is possible the feet pose has been set on the joint orientation instead of the joint rotation. This is a mistake some asset creators make. In this case, it is important to zero out the figure pose (Menu | Edit | Figure | Zero Zero Figure Pose) and run the export process again.
Exporting hair: For reliable results, it's best to export hair separately from the figure. Converting figures with hair usually works, but some hair assets (particularly those with a high vertex count) can create issues when the meshes are merged. In particular, the teeth, lips and eyes can be affected, so if a character with hair has been converted, the best test is to try opening the mouth using the jaw joint or rotating the eyes. If there are any undesirable effects then the hair needs to be exported separately.
Selecting Morphs To Export
Select the morphs you want to export with your figure by clicking the 'Choose Morphs' button. A number of morph list presets have been pre-prepared and are available at the top of the dialog.
Important: Do not select any JCMs for export. Cusom JCMs that are optimised for Unreal Engine are created and exported automatically later in the process.
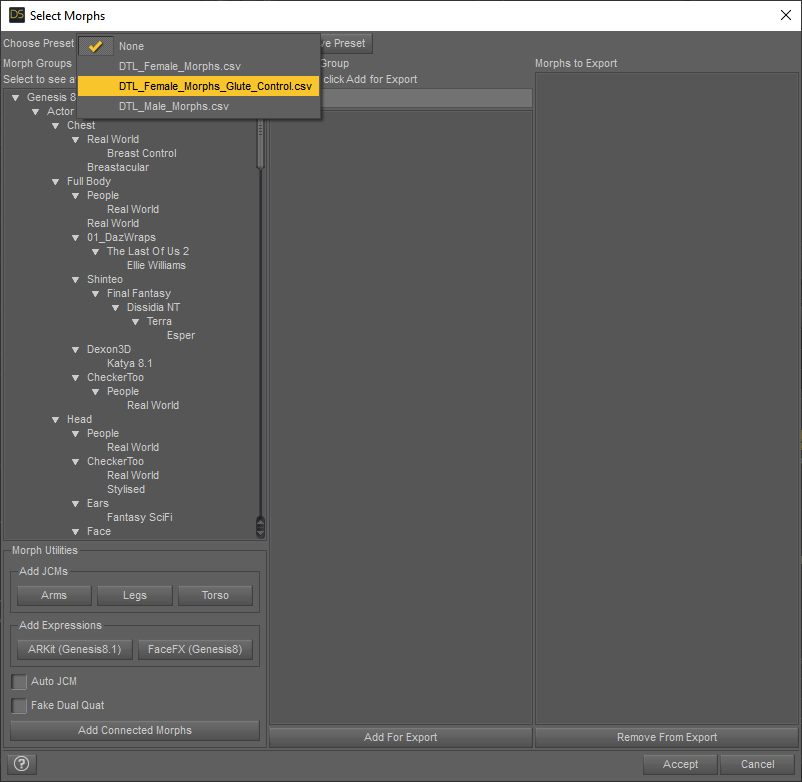 DazToUnreal Export Morphs dialog showing presets
[Optional] Select subdivision levels for the meshes used by your figure by clicking the 'Bake Subdivision Levels' button. Note that setting levels above 1 will exponentially increase processing times and is not recommended.
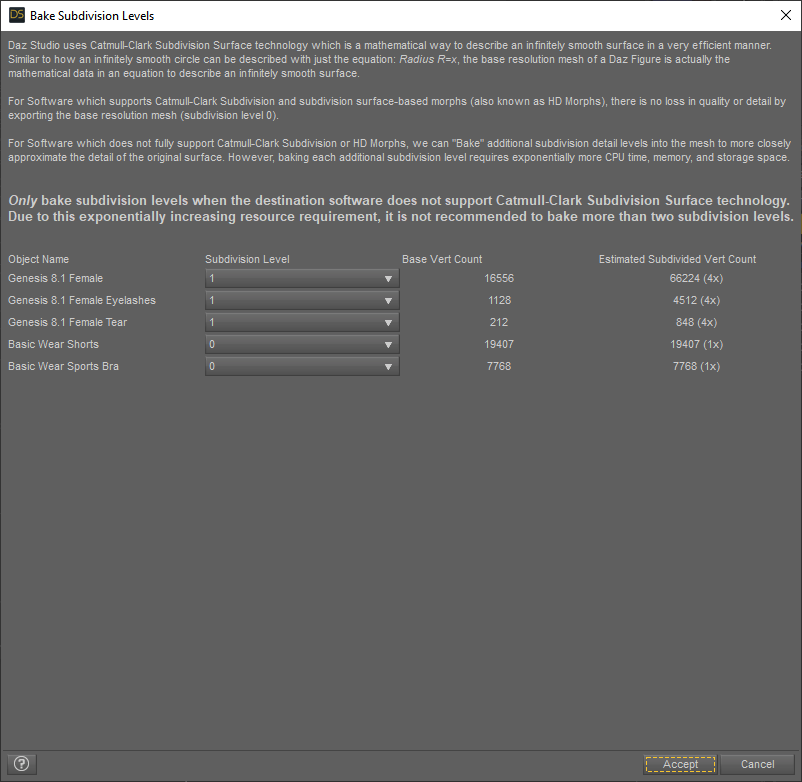 DazToUnreal Bake Subdivision Levels dialog
Step 2: Export JCMs and other morphs using the DTL plugin
Export the JCMs and morphs for DTL by navigating to the 'Scripts' folder in your DazStudio Content Library and click the 'DTL Export' icon.
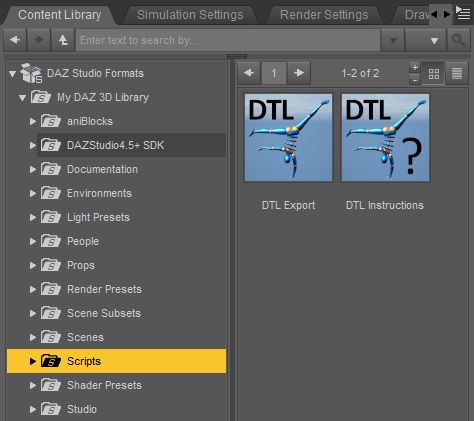 The DTL Export and Help icons in the Daz Content Folder
A file dialog for the .dtu file that DazToUnreal has just produced will appear. Select the .dtu file and click ok.
 File dialog for opening the .dtu file that DazToUnreal has just exported
The DTL Morph Export dialog will appear. Click the 'Accept' button on the dialog and the morph export process will begin.
 The DTL Export Dialog
- DTL Export Dialog Options:
- Export Linear Skinning JCMs: Create the source meshes required to make JCMs in Maya
- Export DTU Specified Morphs: Export the morphs specified in the DazToUnreal export dialog
- Scan For Adjustment Morphs: Export morphs found in the folders specified in 'Documents/Config/AdjustmentsPathList.txt'
- Export Morph Opposites: Export a separate morph for all morphs that have a value below zero
- Export All Texture Options: Export copies of all the textures for each asset (e.g. hair colours, makeup options, tattoos etc)
If 'Export All Texture Options' is enabled, DTL will gather all associated textures into your DazToUnreal/(figure name)/ExportTextures folder so that the complete set of all colour options, makeup options, tattoo options etc for the exported mesh / meshes are in one place ready for material creation in UE.
The time the export process takes depends on the subdivision levels selected, the number of morphs previously selected and the speed of your computer. A message box will appear once the process is complete.
Step 3: Open the dtu file produced by the DazToUnreal plugin in Maya
First, ensure that your version of Maya is up to date. If you have not already done so, install the DTL Maya plugin for your version of Maya. There are instructions for installing the DTL Maya plugin here.
Import your .dtl file via the 'Import .dtu file for DTL' menu entry in Maya's file menu. Note that some users have reported that the script window needs to be open for the process to start. If the open .dtu file dialog does not come up when you click 'Import .dtu for DTL' please open the script console and try again (instructions here).
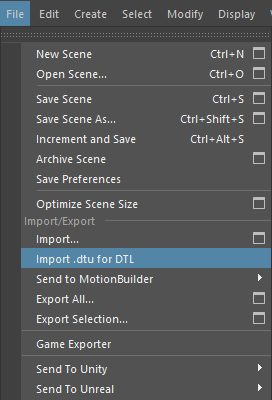 The 'Import .dtu for DTL' menu entry
Navigate to your Documents\DazToUnreal folder and locate the folder with the .dtu file that the DazToUnreal plugin exported. Open this folder and select the .dtu file.
 DTL open .dtu file dialog
The DTL plugin will load up your figure and present a dialog with information about your figure and conversion options. Any issues with nonmanifold geometry will be reported here. Click 'OK' if you want to proceed. Note that the settings are correct for a regular DTL conversion and no changes need to be made. However, under certain circumstances you may want to make changes. Please see this page for a description of all the DTL conversion settings.
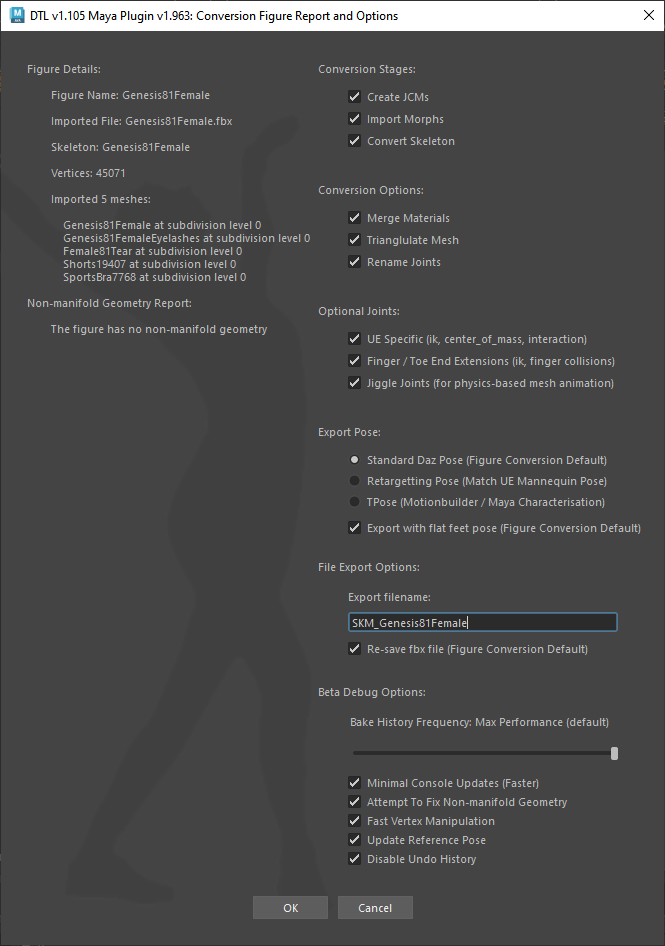 DTL mesh report and conversion setting dialog
Now sit back and wait - the conversion process can take a small forever! If your figure meshes have reasonable Subdivision levels, the conversion should take between a few minutes and a few hours. However that if you have non-manifold geometry, selected Subdivision levels above one or you have exported an fbx file containing many hundreds of thousands of vertices the conversion process can take in excess of ten hours to complete.
Long processing times can be avoided by exporting your figure and its clothes / hair / shoes / props separately. If tests are being run and the JCMs are not required for the test, disabling the 'Create JCMs' option on the Maya DTL options dialog will dramatically speed things up, as it is the creation of JCMs that takes the most time.
Exporting Clothes / Hair / Shoes Separately
Since DTL version 1.5 it it has been possible to export assets separately. To export an asset separately, instead of selecting the figure in Daz's scene hierarchy at the start of the process, select the asset and then follow the steps above. For advice on streamlining the simultaneous export of multiple assets, see here
Note that exporting assets separately has a number of advantages; aside from enabling on-the-fly outfit changes in Unreal Engine, conversion times are significantly reduced and nonmanifold geometry fixes are far more likely to be effective. The conversion process also automatically filters off any JCMs and morphs that do not affect the asset.