On This Page
This page gives an overview of how you can use the DTL demo project to import and prepare your converted character into Unreal Engine before migrating to your own project.
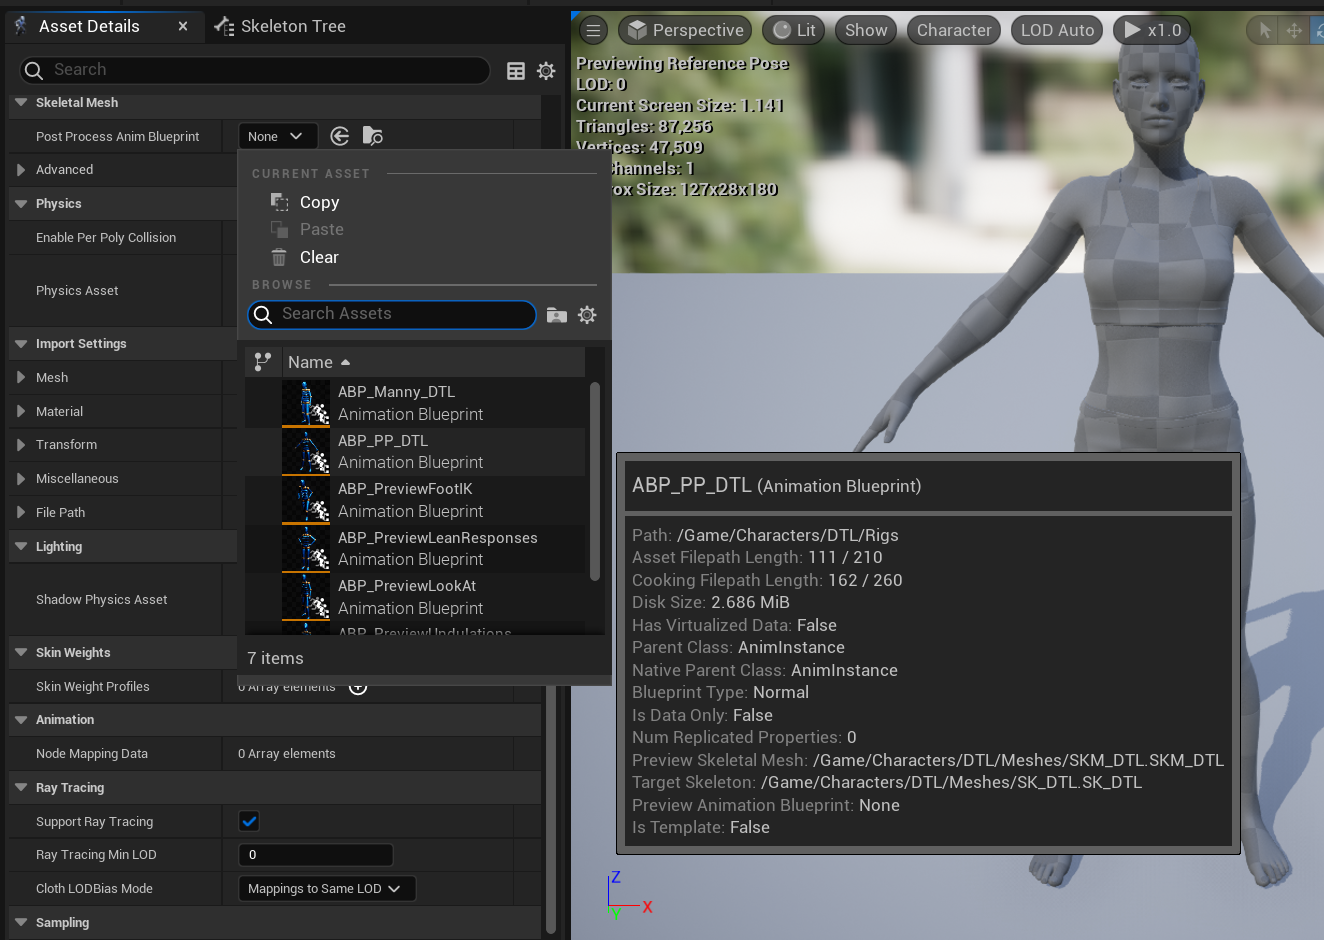 Setting the DTL Animation Blueprint Post Process Asset
This page gives an overview of how you can use the DTL demo project to import and prepare your converted character into Unreal Engine before migrating to your own project.
 Setting the DTL Animation Blueprint Post Process Asset
Once your figure has been converted you will be able to import your figure into the demo project and assign the necessary assets. You are then able migrate your fully functional, converted figure, complete with all rigs, blueprints and other assets required for optimal functioning to your own project. This workflow completes the optimal Daz figure to Unreal Engine pipeline.
The demo projects come with some preconfigured basic functionality, most of which can be accessed by adding a DTL Component and implementing the DTL Interface on your Pawn or Character blueprint. The DTL Component takes care of all the necessary setup to use the supplied functionality. The DTL Component also provides a single location for configuring the settings:
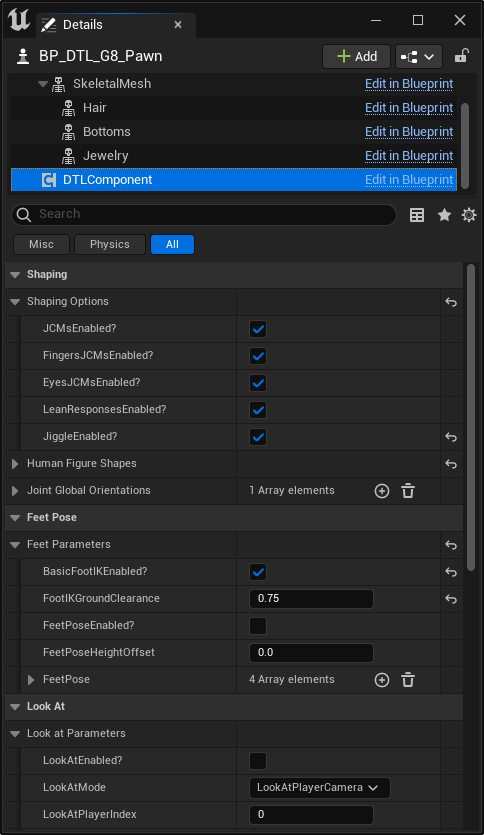 DTL settings exposed by the DTL Component
Note that the use of the DTL Component is not mandatory for the PoseDriver driven JCMs to work. Providing the Animation Post Process Blueprint (ABP PP) is given a reference to the Skeletal Mesh component in EventBeginPlay, the JCMs will work as expected. To make this easier, the ABP PP will automatically get a reference to the Skeletal Mesh if the owner is a Character BP or implements the 'GetSkeletalMesh' interface function, as defined by the DTL Interface. If neither of these conditions are met, then the user will need to call 'Set Skeletal Mesh' on the ABP in EventBeginPlay.
Whilst the materials are automatically created in Unreal Engine when the initial DazToUnreal fbx export takes place, the import and configuration of the final, converted character fbx is performed manually. The four steps to produce a fully functional, Unreal Engine compatible figure are described below.
Important: If the DazToUnreal plugin is enabled and a figure has been imported via DazToUnreal there will be a separate figure, skeleton, ABP Post Process and set of control rigs in your project that are not usable by DTL figures. When importing and configuring your DTL character, it is important to make sure you are using the correct assets; DTL characters are always prefixed with SKM_ and the DTL skeleton is called SK_DTL. Attempting to use DazToUnreal figures, skeleton, ABPs or Control Rigs with a DTL character will not work.
If you are not using DazToUnreal to auto-generate Materials for your character it is recommended to disable / delete the DazToUnreal plugin, as it is not needed in the Unreal Project for anything other than the auto-generation of Materials.
Import the converted fbx as a Skeletal Mesh with the settings shown below. In most cases, only the following settings need changing from default:
Note that the SK_DTL skeleton is compatible with all G8 figures; G8F, G8M, G81F and G81M.
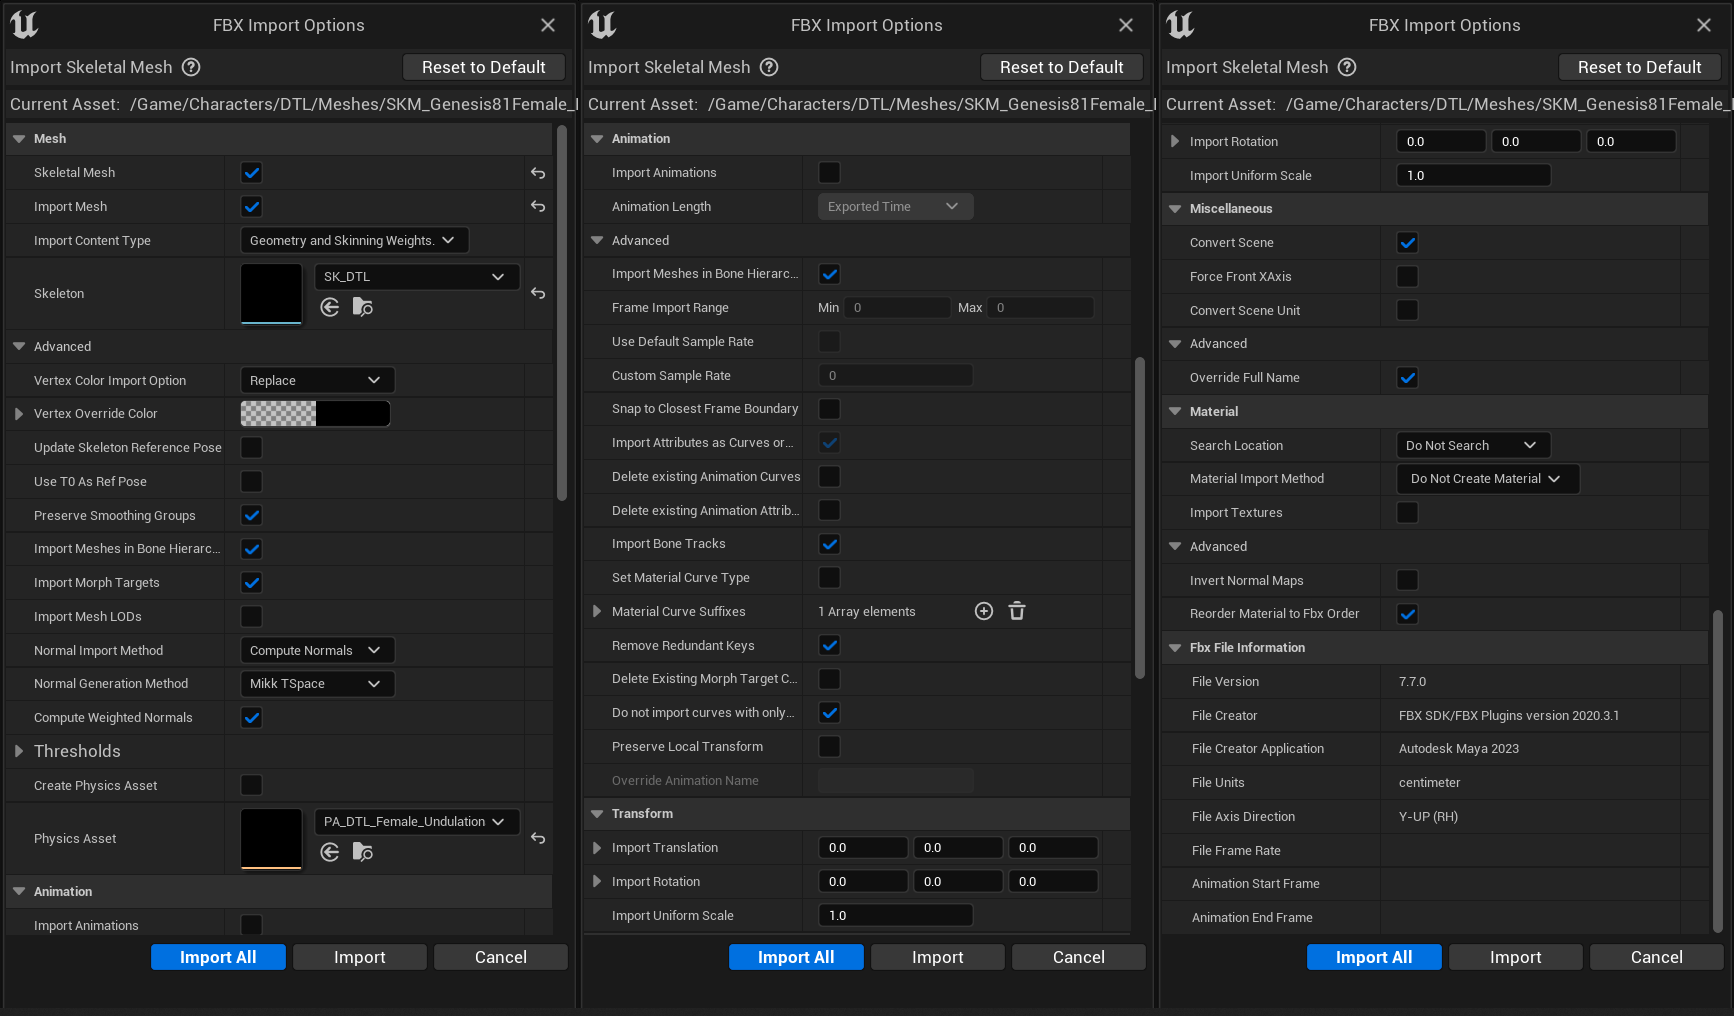 FBX import settings
Open the freshly imported Skeletal Mesh asset and assign the materials found in the DazToUnreal folder:
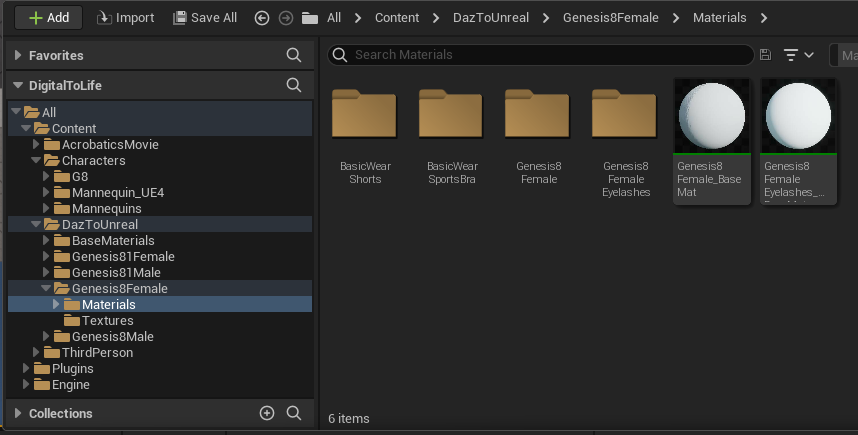 DazToUnreal materials folder
Advanced: There are templates for manually creating DTL skin materials within the demo projects. The DTL materials have a number of advantages over the ones exported by DazToUnreal. For more details, please see the DTL Materials documentation here.
The DazToUnreal materials will have been imported automatically when the DazToUnreal plugin was used to export the fbx from DazStudio. They are found in the Characters/DTL/Materials folder. If they are not present, please ensure the DazToUnreal plugin is installed, ensure the project is open and run the DazToUnreal plugin export process from DazStudio again.
The materials can now be added to their corresponding named slots in the character's editor window as shown below.
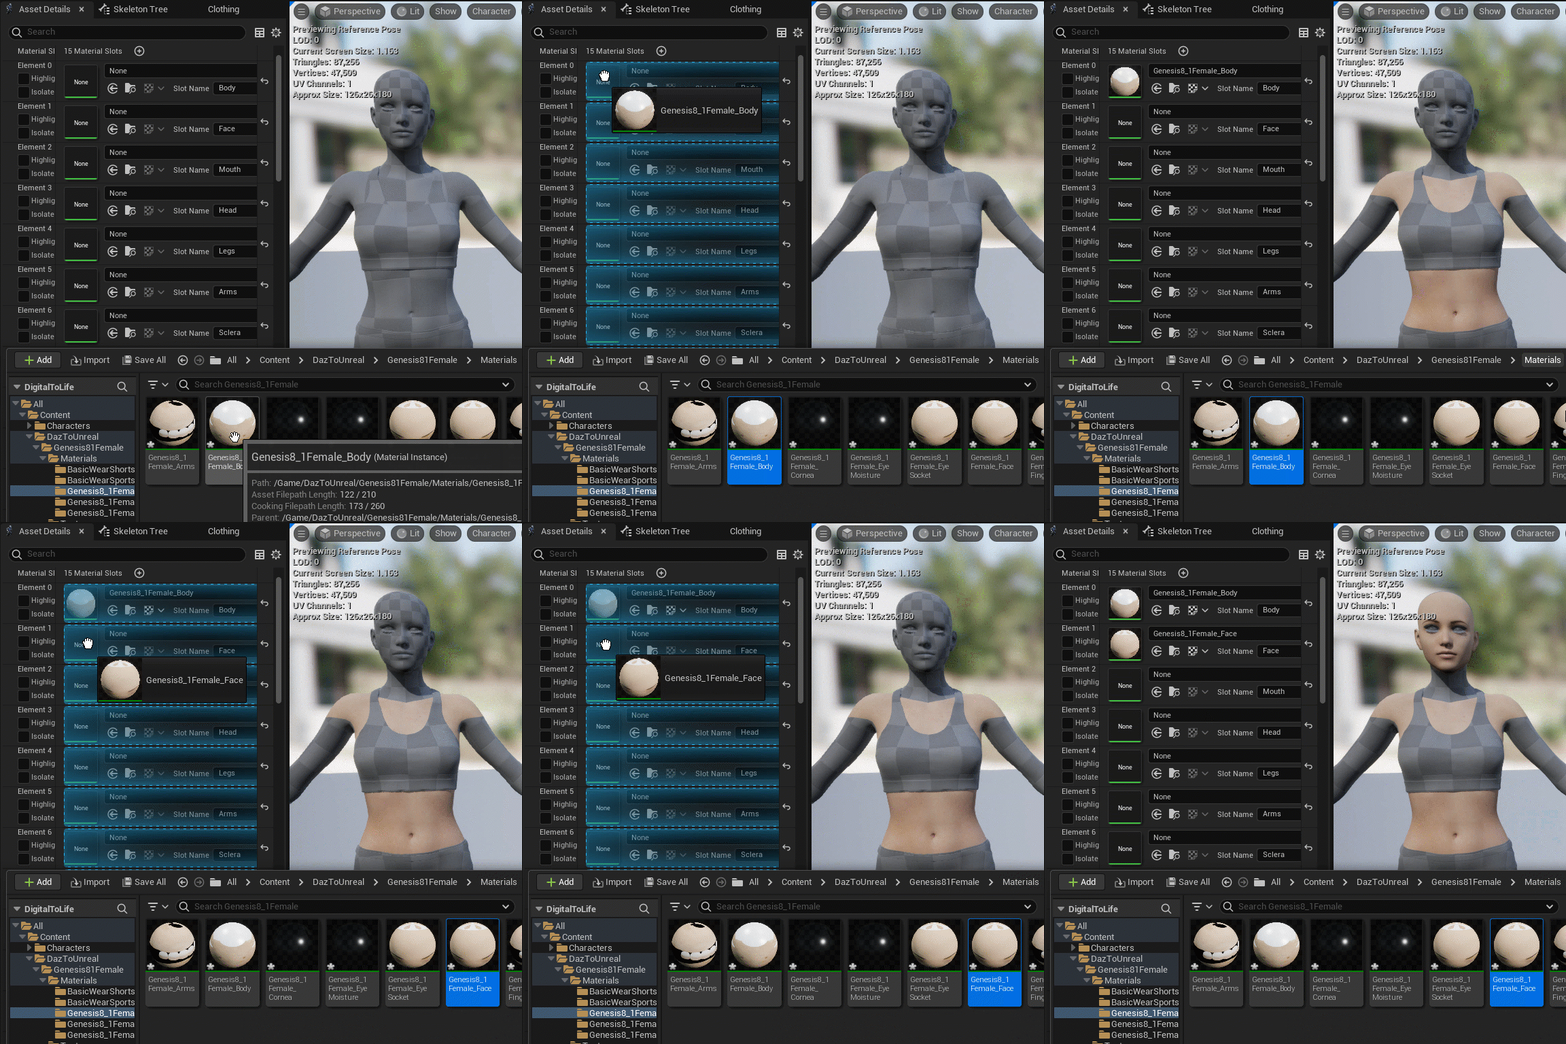 Assigning the DazToUnreal Materials
Set the Animation Blueprint Post Process, Physics Asset and Default Control Rig:
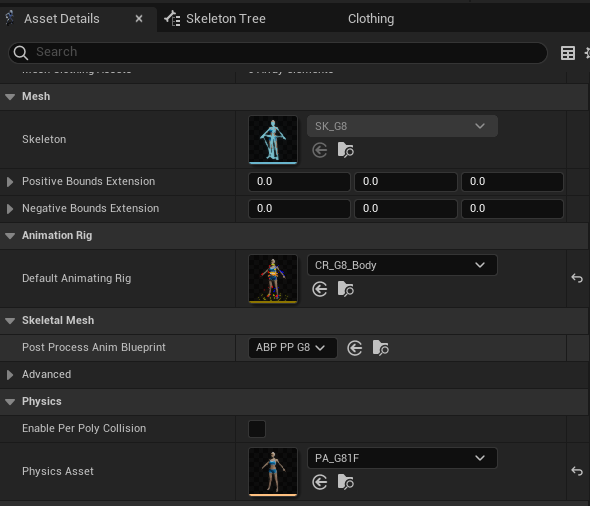 Setting ABP Post Process, Physics asset and Default Control Rig
The fbx file specification does not allow for the exporting of normals for JCMs and other morphs. This will result in shading errors when certain morphs are applied. This can be fixed by enabling the Skin Cache and requesting that Unreal Engine recompute tangents for the affected materials. However, doing so creates fresh issues with visible seams. Unfortunately, these are the only options; visible seams or shading errors. There is detailed information on this issue here.
Recomputing Tangents 1: Enable 'Support Compute Skin Cache' must be enabled in the project settings (this is already set in the demo project)
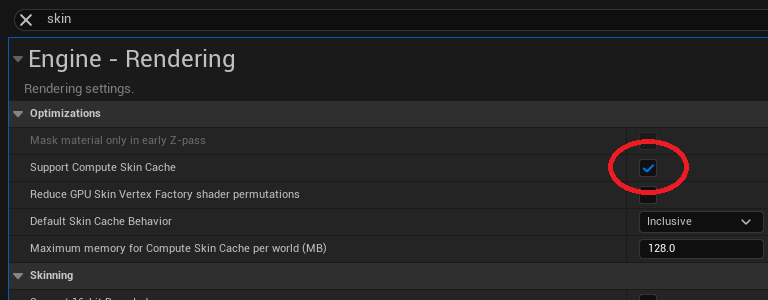 Setting Recompute Tangents to All
Recomputing Tangents 2: 'Recompute Tangents' must be set to 'Red' or 'Blue' for materials in the Skeletal Mesh editor. The setting can be found under LOD0 -> Sections in the figure's Persona. Unreal Engine often takes a significant amount of time to recompute the tangents for each material slot. To save time, usually only the following Material Slots need adjustment; Head, Arms, Legs, Body / Torso, Gens.
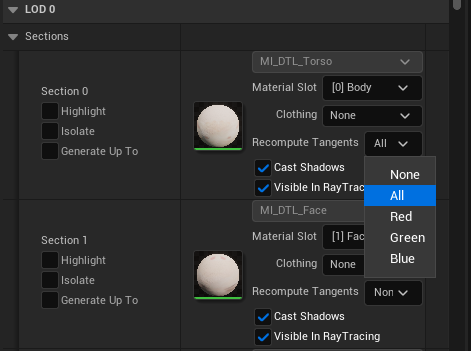 Setting Recompute Tangents to Red or Blue
Your converted figure is now complete. You can test it in any of the three maps supplied in the demo project; Control Rig and Real Time Morphing Demos, Third Person or Acrobatics Movie.
↑